Virtual Bitlocker Containers
This week, I got an interesting question from a customer: "What do you recommend to safely store files in a directory on my laptop?". They are plenty of ways to achieve this, the right choice depending on the encryption reliability, the ease of use and maybe some technical requirements. Sometimes, a simple encrypted zip file will do the job, sometimes something stronger is mandatory. In Microsoft environments, Bitlocker is a nice solution since Windows 7. But it was not the right choice for my customer, he did not want to use Bitlocker in its "FDE" ("Full Disk Encryption") way. For years, I'm a big fan of TrueCrypt which is able to work with partitions but also with containers. When not used, those are seen just as big binary files for the operating system. Since the bad story that happened to TrueCrypt, I switched to GostCrypt, a 100% compatible alternative developed by a group of universities.
If your environment is fully running on top of Windows OS, why not use Bitlocker after all? If it's not possible to encrypt a single directory (as requested by my customer), why not create a container "in the TrueCrypt way"? Do you know that Windows is able to create virtual disk and mount them like a "mount -o loop" on Linux? This operation is achieved with diskpart, a command line tool available in C:\Windows\System32.
Start a command prompt, launch "diskpart" and a new command line window will open: (Note: you will be playing with the file system, so administrator's privileges are required!)

Let's go! First we must create a virtual disk of the size you need, the size being in MB: (Keep in mind that Bitlocker requires a minimum disk size to be enabled)
DISKPART> create vdisk file="c:\container.vhd" maximum=120 type=fixed 100 percent completed DiskPart successfully created the virtual disk file.
Now, the next steps are to select the virtual disk, create a single partition and format it in NTFS:
DISKPART> select vdisk file="c:\container.vhd" DiskPart successfully selected the virtual disk file. DISKPART> attach vdisk 100 percent completed DiskPart successfully attached the virtual disk file. DISKPART> list vdisk VDisk ### Disk ### State Type File --------- -------- -------------------- --------- ---- * VDisk 0 Disk 1 Attached not open Fixed c:\container.vhd DISKPART> list partition There are no partitions on this disk to show. DISKPART> create partition primary DiskPart succeeded in creating the specified partition. DISKPART> list partition Partition ### Type Size Offset ------------- ---------------- ------- ------- * Partition 1 Primary 18 MB 64 KB DISKPART> select partition 1 Partition 1 is now the selected partition. DISKPART> format fs=ntfs label="Secret Container" 100 percent completed DiskPart successfully formatted the volume. DISKPART> active DiskPart marked the current partition as active. DISKPART> assign letter=q DiskPart successfully assigned the drive letter or mount point. DISKPART> exit
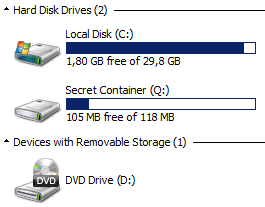
You should now see a new disk connected:

The next step is to enable Bitlocker on the container and configure it like a normal disk. Right click on the new drive and configure Bitlocker as usual.
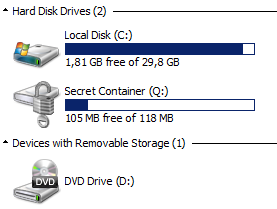
Once completed, the disk looks like a normal Bitlocker container:

To unmount the container, use the "detach vdisk" command in diskpart.
To make the container available after a reboot, the operation to mount the vdisk can be automated via a simple script:
select vdisk file="c:\container.vhd"
select partition 1
attach vdisk
You can execute this script via the following command. Once mounted, the classic Bitlocker pop-up windows will ask you the password to unlock the container.
C:\> diskpart /s bitlocker.txt
With this method, you can easily exchange Bitlocker containers with peers, you can create multiple containers for multiple projects and you can create containers on USB disks without having to reserve the entire space for this purpose!
Xavier Mertens
ISC Handler - Freelance Security Consultant
PGP Key
| Reverse-Engineering Malware: Advanced Code Analysis | Online | Greenwich Mean Time | Oct 27th - Oct 31st 2025 |


Comments
GostCrypt ??
https://en.wikipedia.org/wiki/GOST_%28block_cipher%29#Cryptanalysis_of_GOST
Radomir Tomis
Anonymous
Jan 9th 2016
9 years ago
Anonymous
Jan 10th 2016
9 years ago
GostCrypt ??
https://en.wikipedia.org/wiki/GOST_%28block_cipher%29#Cryptanalysis_of_GOST
Radomir
Anonymous
Jan 10th 2016
9 years ago
Once you have functionality you can think of use cases. We have one here, a secure container for files. Another could be for "offline" storage of a bitcoin wallet? An "offline" backup that ransomware won't touch? Others?
Anonymous
Jan 11th 2016
9 years ago
The reattach script does not need to select a volume in my setup (Windows 10), just select vdisk and attach vdisk.
There is no need for managing keys - only password needed.
That is easy (easier) to manage!
Note! A recovery key will be created and multiple methods for managing that are available. Keep in mind that if someone gives you one of these volumes it is not enough to change the password to lock them out, they could be holding the recovery key. To be safe you would have to decrypt the volume and reenable bitlocker once more; new recovery key and password.
Anonymous
Jan 11th 2016
9 years ago
Anonymous
Jan 11th 2016
9 years ago
Create a scheduled task to be run under SYSTEM or Administrator account and grant the user the permission to run this scheduled task.
Anonymous
Jan 11th 2016
9 years ago
Has all the features and bugs of TrueCrypt too, including http://seclists.org/fulldisclosure/2016/Jan/22
Anonymous
Jan 11th 2016
9 years ago
- To mount the .vhd just double-click it (or any shortcut to it), it will show UAC/login-as-admin prompt (depending on your settings and account type), then you will get the BitLocker popup;
- To unmount it you can right-click->eject directly from the File Explorer (again UAC/login-as-admin prompt may appear).
Bonus : when you double-click the vhd and it's already mounted, file explorer will open a window pointing to the volume root directly (provided you unlocked the volume).
Works at my workplace on several machines on Win10 Pro x64
Anonymous
Jan 11th 2016
9 years ago
- To mount the .vhd just double-click it (or any shortcut to it), it will show UAC/login-as-admin prompt (depending on your settings and account type), then you will get the BitLocker popup;
- To unmount it you can right-click->eject directly from the File Explorer (again UAC/login-as-admin prompt may appear).
Bonus : when you double-click the vhd and it's already mounted, file explorer will open a window pointing to the volume root directly (provided you unlocked the volume).
Works at my workplace on several machines on Win10 Pro x64[/quote]
Nice point about simple double-click, IcePanther. I had found that Eject works, that is also a lot easier! Too bad we can't use this with regular user access, allthough I certainly see why it has to be this way for virtual hard disks. Would be nice if a virtual USB stick could be made available without admin rights.
I think the Scheduled tasks launched scripts, with permissions to be run by regular (interactive?) users, would provide value in this case, as stated by "Anonymous" above. What if we could make them event driven, so that if a user double-clicks the exact volume it gets mounted by the script? Nah, too complicated - won't be used... But I still believe this can be used for good things, such as a scheduled backup task that runs locally and hides the backup in a bitlocker encrypted volume.
Anonymous
Jan 12th 2016
9 years ago