There's value in your logs! (Part 2)
*** This is a guest diary by Dylan Johnson ***
In the first installment of this diary topic I showed you how to collect, normalize, store, graph and search events using Logstash, Graphite, Statsd, Kibana and Elasticsearch however an alerting capability was missing.
https://isc.sans.edu/diary/Guest+Diary%3A+Dylan+Johnson+-+There's+value+in+them+there+logs!/15289
So we have all our logs in one place and can search and graph on a per field basis, but what if we want to go home and generate an alert when a threshold is reached?
The following details a simple yet effective approach to alerting using graphite and Seyren. We covered Graphite in the previous post so we wont revisit this one, however lets talk about Seyren.
What is Seyren ?
Seyren is a nice little alerting application that reads metrics from Graphite and compares them to a threshold you set. If that threshold is met or you approach the threshold it alerts, Simple!
As per the previous post you will need a working Graphite install plus mongodb and of course Seyren https://github.com/scobal/seyren. You will also need Maven in order to install Seyren but it’s just another step and shouldn’t pose you any problems.
Lets get the basics out of the way so you can get this up and running with minimal fuss in a dev environment. Seyren is a Java app so first off you will need Java.
The next thing you will need to do is set you environment variables, making them persistent is a wise choice.
If you are just going to play with this the mongo install shouldn’t need any additional configuration after you install it, Seyren will play with it nicely with the defaults. Configure the SMTP stuff as suggested.
#### Base
* `GRAPHITE_URL` - The location of your graphite server. Default: `http://localhost:80`
* `GRAPHITE_USERNAME` - The Http Basic auth username for the graphite server. Default: ``
* `GRAPHITE_PASSWORD` - The Http Basic auth password for the graphite server. Default: ``
* `MONGO_URL` - The mongo connection string. Default: `mongodb://localhost:27017/seyren`
* `SEYREN_URL` - The location of your seyren instance. Default: `http://localhost:8080/seyren`
#### SMTP
* `SMTP_HOST` - The smtp server to send email notifications from. Default: `localhost`
* `SMTP_PORT` - The smtp server port. Default: `25`
* `SMTP_FROM` - The from email address for sending out notifications. Default: `alert@seyren`
* `SMTP_USERNAME` - The smtp server username if authenticated SMTP is used. Default: ``
* `SMTP_PASSWORD` - The smtp server password if authenticated SMTP is used. Default: ``
* `SMTP_PROTOCOL` - The smtp server protocol if authenticated SMTP is used. Default: `smtp
Download Seyren and follow the install instructions and after this you will need Go to your Seyren base install directory and run.
Nohup java -jar seyren-web/target/dependency/jetty-runner.jar --port 8888 --path /seyren seyren-web/target/seyren-web-1.0.0-SNAPSHOT.war &
This will start up your Seyren application.
Note: You can use the –port option to run this on a port of your choosing.
You should now be able to browse to http://<IP>: 8888/seyren.
WARNING: It’s probably best to run this behind an SSL enabled reverse proxy with authenticati
CREATE A CHECK
So now you have Seyren up and running you will want to create a check. Seyren polls graphite and pulls back vales in order to make comparisons between the data returned and a threshold value you set by you.
So all you need to do is add a path to your graphite data source in the alerting setup. This is the data source you will be monitoring and alerting on.
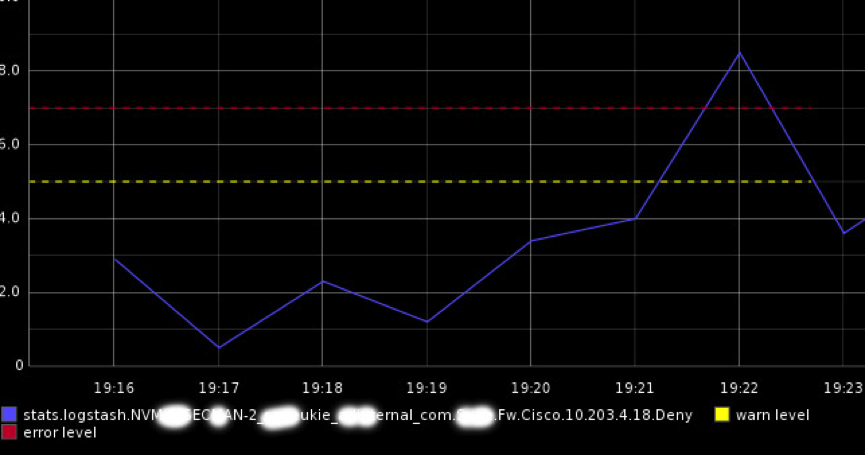
An easy way to find this path is to derive it from the graphite graph you want to monitor.

It’s the one that’s ending in. deny above! That’s your data source for your first alert!
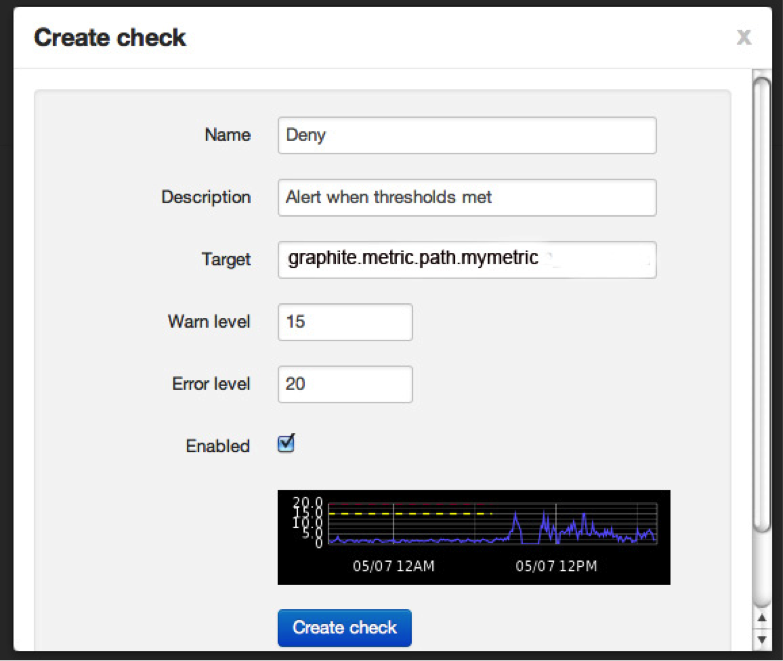
Next we create your first check. Use your graphite data source path as found in the previous step and set your warn and error levels. When Seyren pulls back a value that matches your warn / error level from Graphite it will do something!

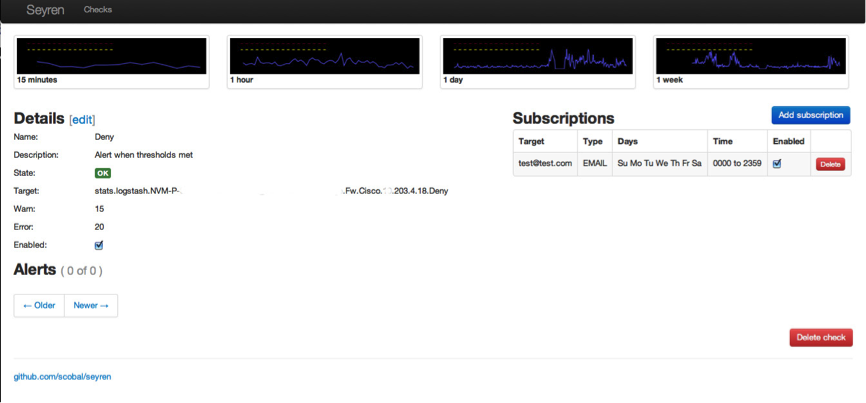
Create the check and you should see the following showing what your check is doing.

ADD YOUR SUBSCRIPTIONS
If you click on STATE you will be able to add your subscriptions. I just added an email recipient to receive alerts.

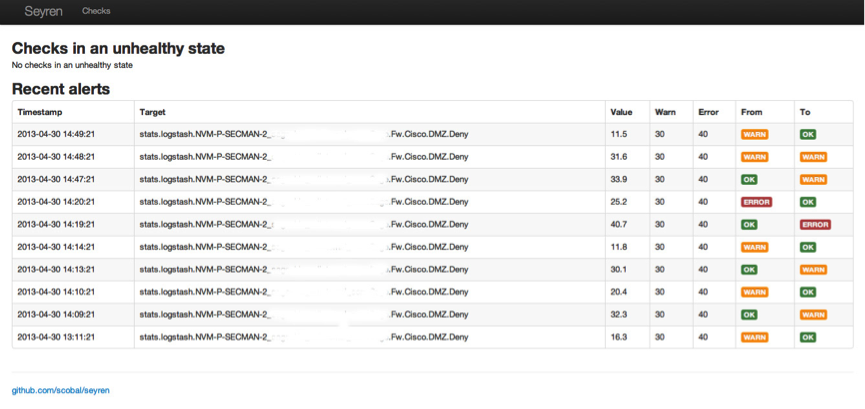
All this configuration data is saved in the mongodb. Once you have set up your checks you can check the state of these via the main page. The image below shows how the checks move from state to state. In this example this is because the # of denied firewall packets reached a threshold value I set. Don’t worry, you don’t get DDoS’d with messages! You get one for each change in state as below.
The Deny alert state due to values above the set threshold

The Deny alert state due to values below the set threshold, a total of two messages sent. You can all send to other destinations like hipchat etc !

ALERT HISTORY
The Seyren home page shows the alert status for all your checks as seen below.

SOME BASIC USE CASES
A couple of alert use cases that could help your PCI: DSS compliance efforts are as follows:
Obviously you have to collect the relevant data from your assets in order to do this and I will show you how to do this and parse all these logs next time!
Use Case Event Source
Failed logins -à Auditd / WinEvt / Radius / LDAP / AD
Denied Network traffic -à IPtables / Syslog
Virus Numbers -à ePO registered executable / Defender
Port Scans -à portsentry / Snorth
ModSec -à rule severity
Snort -à rule type
My previous post showed you how to normalize and analyze massive volumes of data in real-time and this post shows you how to add simple alerting automation. If you have all these components set up you now have a true basic security event management system.
In my next post I am going to use all of the tools and techniques detailed in my last two posts and show you how to use them to create a security event management system enabling an autonomous PCI:DSS and ISO27002 security event management system.
ADDITIONAL CONFIGURATION FOR SEYREN
As per the previous post you will need a working Graphite install plus mongodb and of course Seyren https://github.com/scobal/seyren
The first thing you will need to do is set you environment variables, making them persistent is a wise choice.
If you are just going to play with this the mongo install shouldn’t need any additional configuration after you install it, Seyren will play with it nicely with the defaults. Configure the SMTP stuff as suggested.
#### Base
* `GRAPHITE_URL` - The location of your graphite server. Default: `http://localhost:80`
* `GRAPHITE_USERNAME` - The Http Basic auth username for the graphite server. Default: ``
* `GRAPHITE_PASSWORD` - The Http Basic auth password for the graphite server. Default: ``
* `MONGO_URL` - The mongo connection string. Default: `mongodb://localhost:27017/seyren`
* `SEYREN_URL` - The location of your seyren instance. Default: `http://localhost:8080/seyren`
#### SMTP
* `SMTP_HOST` - The smtp server to send email notifications from. Default: `localhost`
* `SMTP_PORT` - The smtp server port. Default: `25`
* `SMTP_FROM` - The from email address for sending out notifications. Default: `alert@seyren`
* `SMTP_USERNAME` - The smtp server username if authenticated SMTP is used. Default: ``
* `SMTP_PASSWORD` - The smtp server password if authenticated SMTP is used. Default: ``
* `SMTP_PROTOCOL` - The smtp server protocol if authenticated SMTP is used. Default: `smtp`
| Application Security: Securing Web Apps, APIs, and Microservices | Las Vegas | Sep 22nd - Sep 27th 2025 |


Comments