DShield and qemu Sitting in a Tree: L-O-G-G-I-N-G
[This is a Guest Diary by Allen Ingle, an ISC intern as part of the SANS.edu BACS program]
Introduction
Setting up and configuring the DShield Honeypot is an important component of contributing to the SANS Internet Storm Center (ISC) [1]. The recommended OS and hardware for hosting the installation is Raspberry Pi OS Lite [2] on any of the Raspberry Pi hardware versions [3]. That said, for development work and experimentation, constantly re-installing the OS on the physical hardware isn’t the most convenient process and an additional expense for more Raspberry Pi’s isn’t exactly appealing either. Similarly, someone interested in dipping their toe in the honeypot waters might not want to commit to purchasing the Raspberry Pi hardware right away.
So, what is a cost effective and time-efficient solution that doesn’t require any additional hardware that takes advantage of native Windows functionality? This blog post details how to use qemu to accomplish exactly that.
Why the DShield Honeypot?
The DShield honeypot serves as a data collection point for the SANS ISC. In doing so, DShield deployments support the ISC’s aim to crowdsource monitoring of malicious activities online. However, as with many code repositories, issues crop up from time to time [4]. A few of the issues personally encountered include:
- Minor issues with the install.sh setup script.
- Data retention issues in the isc-agent/web honeypot.
- Inability to access full web honeypot logs on the local system.
- Compatibility quirks with Ubuntu Server 22.04.2 LTS.
Contributing to the DShield project serves not only the project itself but also the broader information security community. qemu, an open-source hardware emulator, provides a comprehensive solution for this, from the deployment of a DShield honeypot to troubleshooting and testing. Although qemu is most often associated with Linux environments, it can be seamlessly operated within Windows through the Windows Subsystem for Linux (WSL), making it a versatile tool for facilitating DShield honeypot deployment.
Getting Setup on Windows Subsystem for Linux (WSL)
For myself, the most pressing problem for troubleshooting encountered issues is overcoming limited hardware availability: having only a single Raspberry Pi 4B 8 GB, a time and cost-effective solution is needed. One such solution is to use WSL. WSL allows Linux applications and utilities to be run directly on Windows. In this case, it can also be used as the base for qemu installation. The online documentation can guide how to configure Ubuntu 22.04 LTS on WSL. [5] It can also be installed from the Microsoft Store. [6]
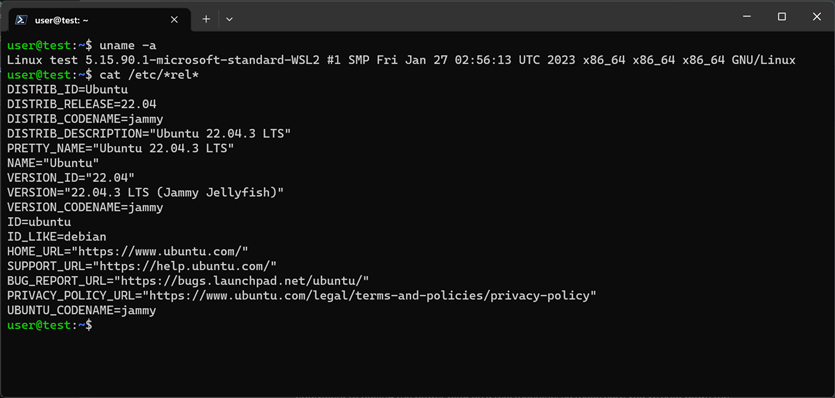
Figure 1: Ubuntu 22.04 LTS running on Windows 11 WSL
Upgrading and Configuring Ubuntu 22.04 LTS on WSL for qemu Support
Once Ubuntu 22.04 LTS is installed on the WSL, the operating system will need to be updated and specific packages installed to facilitate qemu operations, as well as prepare for subsequent setup tasks. Execute the following commands to achieve this:
sudo apt update -y && sudo apt upgrade -y # update the OS
sudo apt install -y qemu openssl qemu-utils fdisk qemu-system-arm bc # install packages
Executing these commands serves dual purposes: it updates the Ubuntu installation to the latest version, improving security, and it equips the system with essential tools for deploying and managing a DShield honeypot via qemu.
Investigating a qemu Solution
Already aware that qemu could provide hardware emulation but not certain if it would accomplish the task or how to implement it, research was initiated to see if this trail had already been blazed.
Early research identified two major leads:
- Raspberry Pi 3B qemu Built-in Support: qemu has a built-in machine configuration for a variety of Raspberry Pi boards up to 3B. [7]
- Raspberry Pi 3B qemu Configuration: Radu Zaharia has an excellent post detailing some of the configuration options when implementing qemu to emulate Raspberry Pi 3B hardware. [8]
Obtaining the Latest Raspberry Pi OS Lite (ARM) Disk Image
Equipped with this information, the next step is to download the latest version of Raspberry Pi OS Lite:
| Commands | Notes |
mkdir ~/rpi && cd ~/rpi |
create a directory named ‘rpi’ and change to it |
wget -q --show-progress https://downloads.raspberrypi.org/raspios_lite_armhf_latest -O raspios_lite_armhf_latest.img.xz |
download the latest Raspberry Pi OS Lite image for arm architectures |
xz --decompress ./ raspios_lite_armhf_latest.img.xz |
decompress the image |
cp raspios_lite_armhf_latest.img.xz rpi-16g.img |
make a working copy |
Command Table 1: Download & extract Raspberry Pi OS Lite (armhf)

Figure 2: Downloading with 'wget'
Resizing and Mounting the Disk Image with a Calculated Offset
Next, the image file must be resized and mounted. The offset of the first partition in the image file will also need to be calculated in order to mount the image correctly.
| Commands | Notes |
qemu-img resize ./rpi-16g.img 16G |
resize the .img file |
fdisk -l ./rpi-16g.img |
calculate the offset based on the start of the first partition |
sudo mkdir /mnt/rpi |
create a directory to mount to |
sudo mount -o loop,offset=4194304 ./rpi-16g.img /mnt/rpi |
mount the .img using the offset we calculated |
Command Table 2: Resize and mount the .img file
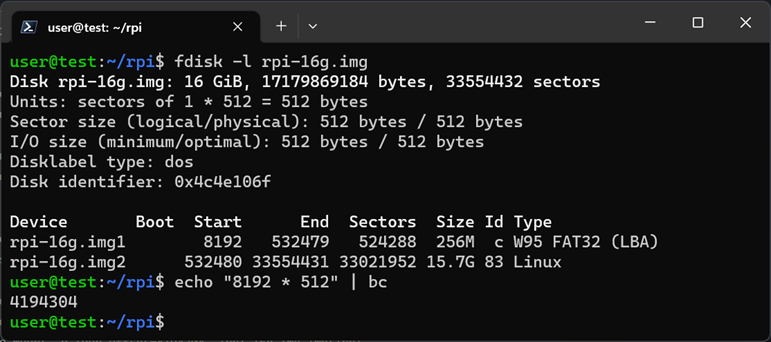
Figure 3: Calculating the offset with ‘bc’
Creating a ‘userconf’ File to Enable Login
To log in after booting, a ‘userconf’ file should be created in the appropriate directory on the mounted image.
| Commands | Notes |
echo 'pi' | openssl passwd -6 -stdin |
generates a SHA-512 hashed password out of ‘pi’ |
sudo nano /mnt/rpi/userconf |
creates the userconf file |
Command Table 3: Generate a 'userconf' file and populate it with credentials
The following string, when placed in the ‘userconf’ file, will create the user ‘pi’ with password ‘pi’
pi:$6$/0QsZLLqVv.MTT9N$jUbZ6jl14gI1EEMhE8jHmiyZf5CF4ggZDwzmW1oV/e/92F7MPqOPgFW6JBs6coPsk94IMjZIyW4K21wRsM0Qb1
Note: The use of the username ‘pi’ and password ‘pi’ is for demonstration purposes only. These credentials are commonly targeted by attackers and should not be used in a production environment. [9]
First Boot!
With that done, it’s time for the first boot by executing the following:
qemu-system-aarch64 \
   -machine raspi3b \
   -cpu cortex-a72 \
   -dtb /mnt/rpi/bcm2710-rpi-3-b-plus.dtb \
   -m 1G -smp 4 \
   -kernel /mnt/rpi/kernel8.img \
   -sd ~/rpi/rpi-16g.img \
   -nographic \
   -device usb-net,netdev=net0 \
   -netdev user,id=net0,hostfwd=tcp::2222-:2222,hostfwd=tcp::2223-:2223,hostfwd=tcp::8000-:8000 \
   -append "rw earlyprintk loglevel=8 console=ttyAMA0,115200 dwc_otg.lpm_enable=0 root=/dev/mmcblk0p2 rootdelay=1"
| Option | Explanation |
-machine raspi3b |
Sets the emulated machine to Raspberry Pi 3 Model B. |
-cpu cortex-a72 |
Sets the CPU model to Cortex-A72. |
-dtb /mnt/rpi/bcm2710-rpi-3-b-plus.dtb |
Path to the Device Tree Blob (DTB) file (part of the mounted image) |
-m 1G |
Allocates 1 GB of RAM to the machine. |
-smp 4 |
Sets the number of CPU cores to 4. |
-kernel /mnt/rpi/kernel8.img |
Path to the kernel image. |
-sd ./rpi-16g.img |
Specifies the SD card image to be used. |
-nographic |
Disables graphical output, uses terminal instead. |
-device usb-net,netdev=net0 |
Adds a USB network device with the specified netdev backend. |
-netdev user,id=net0,hostfwd=tcp::2222-:2222,hostfwd=tcp::2223-:2223,hostfwd=tcp::8000-:8000 |
Creates a user-mode network backend with port forwarding from our host (Windows) to our guest (DShield) through qemu for the specified ports: 2222, 2223, and 8000 (needed for DShield). |
-append "rw earlyprintk loglevel=8 console=ttyAMA0,115200 dwc_otg.lpm_enable=0 root=/dev/mmcblk0p2 rootdelay=1" |
Kernel command line options. (Needed to boot at all) |
Command Table 4: Explanation of qemu options
Resize the Raspberry Pi Disk and File System
Recall that the size of the image file has already been changed to 16GB, but now the OS will need to update its disk and file system to take advantage of the additional space. This requires rebooting the emulated device but it is recommended to shut it down instead. Issuing a reboot to the Raspberry Pi OS tends cause qemu to hang.
| Commands | Notes |
| df -h | check the size of /dev/root |
| sudo fdisk -l | get the starting offset of the second partition (532480) |
| sudo fdisk /dev/mmcblk0 | enter the fdisk utility |
| # d, 2 # c, n, p, 2, 532480, <enter>, n # w |
options to enter into the fdisk utility |
| sudo shutdown now | shut down the emulated device |
| # You are now back at the WSL prompt. Up arrow until at the qemu command previously used to launch your emulated Raspberry Pi device and execute it to boot again. | |
| df -h; sudo resize2fs /dev/mmcblk0p2; df -h | command sequence to check, resize, and verify the filesystem |
| sudo shutdown now | shut down the emulated device |
| # You are now back at the WSL prompt. Up arrow until at the qemu command previously used to launch your emulated Raspberry Pi device and execute it to boot again. | |
Command Table 5: Resize the Raspberry Pi OS Lite disk & update the file system to show the full 16GB
After successfully executing the commands above, the device should have a configuration similar to this:
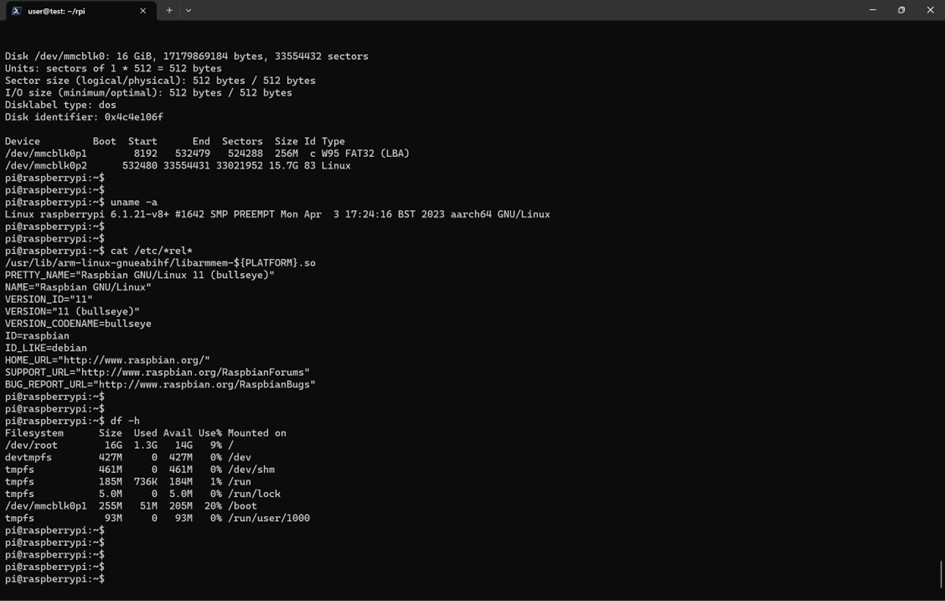
Figure 4: After updating the disk and file system, /dev/root shows 16G as the size
Update the Raspberry Pi and Check the Kernel Version
At this point, there is plenty of disk space to update the device and upgrade it, if needed. Use the following one-liner to accomplish this:
| Commands | Description |
sudo apt update -y && sudo apt dist-upgrade -y && sudo apt autoremove -y && sudo apt clean -y && sudo apt autoclean -y |
Update, upgrade, and clean the system |
Command Table 6: Commands to update the Raspberry Pi OS
DONT SHUTDOWN/REBOOT YET!
The qemu command used to initiate the emulated Raspberry Pi specifies a kernel image file with the “-kernel /mnt/rpi/kernel8.img” option. When updating and upgrading the installation, the kernel image located at “/mnt/rpi/kernel8.img” will not be updated automatically. This can result in issues with the emulated Raspberry Pi's functionality.
Execute the following on your emulated Raspberry Pi BEFORE shutting down to provide a URL for downloading an updated kernel8.img file. Copy the URL and then shutdown the Raspberry Pi device.
# On the Raspberry Pi BEFORE Shutting Down
KVER=$(dpkg -s raspberrypi-kernel | grep Version | awk '{print $2}' | cut -d':' -f2 | cut -d'-' -f1); \
echo "https://github.com/raspberrypi/firmware/raw/$KVER/boot/kernel8.img"
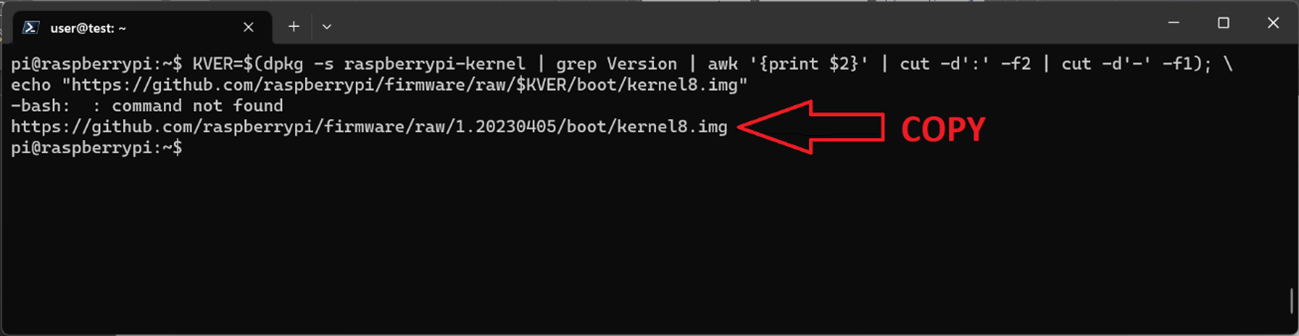
Figure 5: Copy the URL to download the correct kernel8.img directly from the Raspberry Pi repo
# Copy the URL echoed out and shut down the Raspberry Pi
sudo shutdown now

# Back on your WSL prompt
sudo wget -q --show-progress <COPIED URL GOES HERE> -O /mnt/rpi/kernel8.img
Install DShield
DShield can now be installed by following the guidance on the official GitHub repository for Raspberry Pi [10] or using the commands below. Be sure to obtain an API key by creating an account at the Internet Storm Center [11]. It is needed during installation and, later, to contribute logs to the DShield project.
# Enable SSH
sudo systemctl enable ssh; sudo systemctl start ssh

# Install DShield
sudo apt -y install git
git clone https://github.com/DShield-ISC/dshield
cd dshield/bin
sudo ./install.sh
L-O-G-G-I-N-G
At this stage, the qemu-emulated Raspberry Pi is operational with the DShield Honeypot installed and it is nearly to the point of aggregating logs. The next critical step involves enabling external access to the honeypot. This requires strategically configuring the network perimeter device, be it a router, firewall, or other security appliance, to route inbound traffic from your public IP address to the relevant listening ports on the Windows host machine.
Before diving into the specifics of configuring the Windows Firewall, lets first discuss the path that incoming malicious traffic will follow. Using the "hostfwd" parameter in the qemu command string, wslrelay.exe (on WSL) will create corresponding listeners on the Windows host, setting the stage for the subsequent forwarding of traffic.
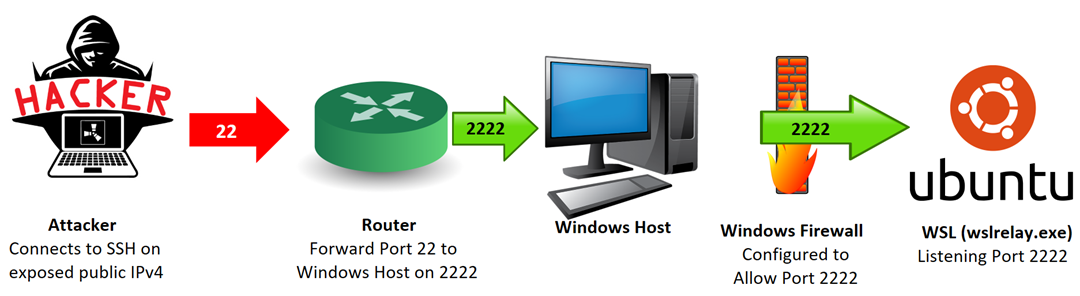
Figure 6: Attack SSH traffic forwarded to port 2222, through the Windows Firewall, and on to the wslrelay.exe listeners
Any traffic that hits those ports will be forwarded via wslrelay.exe from the Windows host (Ubuntu on WSL) to the Raspberry Pi OS guest (DShield on Raspberry Pi OS).
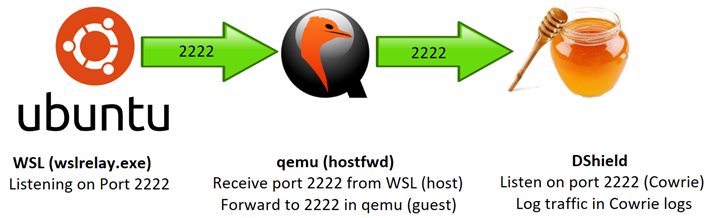
Figure 7: Inside the wsl environment, qemu forwards the SSH traffic from host to guest where DShield is listening
In the example depicted above, the qemu configuration implemented is based on the following "hostfwd" parameter:
hostfwd=tcp::2222-:2222
From here, the Cowrie SSH honeypot will take over and log the malicious traffic in the Cowrie logs.
If that seems complicated, no worries! These processes are automated through the initial execution of the qemu command string and the establishment of corresponding Windows Firewall rules that permit incoming traffic on the specified ports.
Configure the Windows Firewall – Adding Rules
Before configuring the Windows Firewall, take stock of what is about to happen. This will intentionally poke a hole in the Windows host’s firewall to allow malicious traffic in. The firewall rules below will remain up until intentionally taken back down.
If this is an acceptable risk, then let’s carry on!
The following must be run in a command prompt with Administrator privileges:
netsh advfirewall firewall add rule name="DShield SSH" dir=in action=allow protocol=TCP localport=2222
netsh advfirewall firewall add rule name="DShield Telnet" dir=in action=allow protocol=TCP localport=2223
netsh advfirewall firewall add rule name="DShield Web" dir=in action=allow protocol=TCP localport=8000
These rules will allow traffic through the Windows firewall where qemu should already be running and wslrelay.exe will be listening.

Figure 8: wslrelay.exe listening on the same ports that are now exposed
It will then be picked up by the corresponding ports on your DShield honeypot.
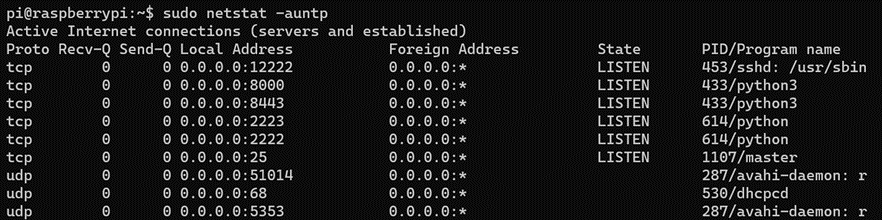
Figure 9: The DShield honeypot listening on those ports inside the qemu environment
Configure the Windows Firewall – Removing Rules
To remove the firewall rules, the following must be run in a command prompt with Administrator privileges:
netsh advfirewall firewall delete rule name="DShield SSH" protocol=TCP localport=2222
netsh advfirewall firewall delete rule name="DShield Telnet" protocol=TCP localport=2223
netsh advfirewall firewall delete rule name="DShield Web" protocol=TCP localport=8000
These rules should be removed before you shut down your honeypot.
Security Considerations
For a more robust and secure DShield honeypot setup, the following best practices are recommended. Compatibility with specific hardware, BIOS, and system configurations should be verified through testing.
- QEMU Sandboxing: Utilize the ‘-sandbox on’ flag in qemu to restrict system calls and enhance security.
- Resource Limitation: Set CPU and memory limits for the guest VM to mitigate resource exhaustion attacks.
- This configuration sets ‘-smp 4 -m 1G’ to allocate four CPU cores and 1 GB of RAM.
- Port Forwarding: Forward only essential ports required for DShield functionality.
- Network Segmentation: Place the host machine on a separate network or VLAN to isolate it.
- Software Updates: Apply updates to both Windows and Ubuntu and use the latest DShield version.
- SSH Security for DShield: Enable key-based authentication and disable root login when using SSH to access DShield honeypot logs.
At the end of the day, there will always be risk when running a honeypot on any network, much less poking a hole in the firewall. Ensure these risks fit well within the risk profile used for operating on any personally owned devices or networks.
Alternatives for Accomplishing Similar Results
This isn’t the only means of virtualizing a DShield honeypot. The following alternatives were explored, and some were even implemented, but running it locally, inside qemu, has proven to be the most representative of the recommend installation without additional Raspberry Pi hardware.
- Virtual Machines: These offer a convenient option for running a DShield honeypot on Ubuntu 22.04 LTS [12] but lacks support for the recommended Raspberry Pi OS Lite or the ability to emulate ARM-based hardware.
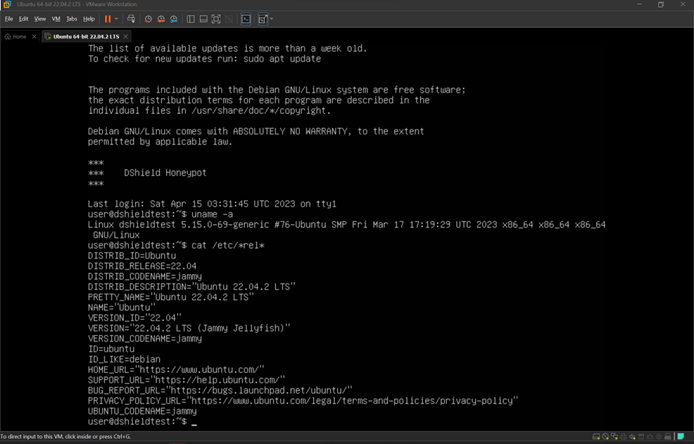
Figure 10: DShield on Ubuntu 22.04 LTS running in a VM
- WSL: The Windows Subsystem for Linux is an easier option for using Ubuntu 22.04 LTS to set up a DShield honeypot but suffers from the same lack of support for testing and troubleshooting Raspberry Pi OS Lite on emulated ARM-based hardware. [13]
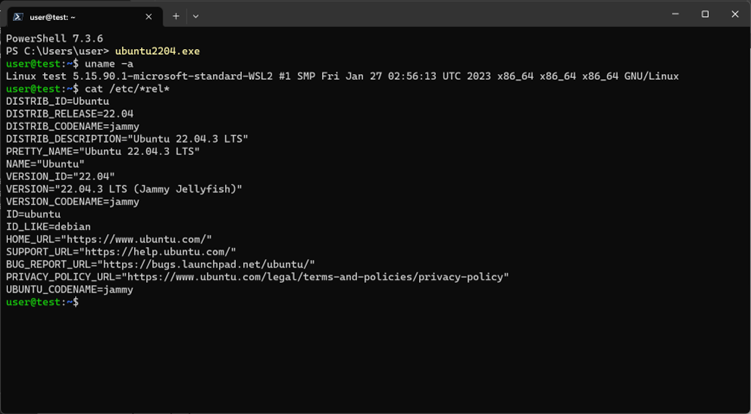
Figure 11: Ubuntu 22.04 LTS running in WSL
- qemu: Offers hardware emulation and supports running the latest versions of the recommended operating system. [14]
- Docker Containers: Containers can replicate the software environment needed for DShield but lack hardware emulation capabilities. Additionally, existing solutions are dated. [15]
- Cloud-based Virtualization: Some cloud services offer ARM-based virtual machines. However, the additional costs can still be a drawback. [16]
What Is the Question Being Answered?
- What is a cost effective and time-efficient way to set up additional DShield honeypots without requiring any additional physical hardware?
Who Would Benefit from This Information and Why?
- Cybersecurity Researchers: Students and professionals focused on cybersecurity could utilize this information to effectively set up virtual honeypots. This provides them with a budget-friendly, scalable alternative to physical honeypots, thereby accelerating their research efforts.
- Software Developers: Those constrained by hardware limitations can benefit immensely from leveraging qemu. This tool allows them to emulate the specific hardware features of multiple Raspberry Pi devices by aiding in testing and development without hardware limitations or supply concerns. [17]
- SANS BACS Interns: Students participating in the SANS BACS internship program would find this information invaluable. It offers a way to rapidly deploy a honeypot without the need for purchasing and configuring hardware, allowing them to focus more on the core elements of their internship tasks.
Conclusion
This blog post provides an in-depth guide on how to deploy a DShield Honeypot using qemu on a Windows system with the Windows Subsystem for Linux (WSL). This approach offers a cost-effective and time-efficient way to contribute to the SANS ISC without needing to invest in additional hardware like a Raspberry Pi. By leveraging qemu's hardware emulation capabilities, this guide details the entire process, from setting up the initial environment, to resolving issues with kernel updates, and even configuring the Windows Firewall for data collection.
This strategy makes it easier to test, troubleshoot, and deploy DShield honeypots, and, in doing so, aid the broader cybersecurity community in gathering essential data about online threats. Whether you are a seasoned cybersecurity professional or a beginner interested in honing your skills, this qemu-based DShield honeypot deployment strategy offers an accessible pathway to contributing valuable data to the SANS ISC.
References
[1] https://www.dshield.org/tools/honeypot/
[2] https://github.com/DShield-ISC/dshield/blob/main/docs/install-instructions/Raspbian.md
[3] https://isc.sans.edu/diary/22680/
[4] https://github.com/DShield-ISC/dshield/issues
[5] https://learn.microsoft.com/en-us/windows/wsl/install
[6] https://apps.microsoft.com/store/detail/ubuntu-22042-lts/9PN20MSR04DW
[7] https://www.qemu.org/docs/master/system/arm/raspi.html
[8] https://raduzaharia.medium.com/system-emulation-using-qemu-raspberry-pi-3-4973260ffb3e
[9] https://tehtris.com/en/blog/our-selection-of-alerts-on-honeypots-report-9-may-2023
[10] https://github.com/DShield-ISC/dshield
[11] https://isc.sans.edu/register.html
[12] https://github.com/DShield-ISC/dshield/blob/main/docs/install-instructions/Ubuntu.md
[13] https://raspberrypi.stackexchange.com/questions/135262/how-to-install-raspberrypios-on-wsl
[14] https://www.qemu.org/docs/master/system/arm/raspi.html
[15] https://github.com/xme/dshield-docker
[16] https://www.mythic-beasts.com/order/rpi
[17] https://www.tomshardware.com/news/raspberry-pi-4-supply-issues


Comments